Form Builder
The form builder lets you visually design the intake form that data subjects see when they submit a privacy request — no JSON editing required. You can add fields, configure their properties, set up conditional visibility rules, reorder fields with drag-and-drop, and preview the form as the end user will see it.
For the equivalent JSON-based approach, see Configuration. To build a complete form step by step, follow the tutorial.
Accessing the form builder
- Navigate to Properties in the Admin UI sidebar.
- Select the property you want to configure.
- Under the privacy request action, click Edit form.
The form builder opens in a three-panel layout:
- Left panel — AI assistant that can help generate or modify your form.
- Center panel — Form canvas showing all fields. This is where you add, reorder, and preview fields.
- Right panel — Properties panel for configuring the currently selected field.
Adding fields
Click the Add field button above the form canvas. Fields are organized into two categories:
Identity fields
Identity fields collect standard identifying information and map directly to the privacy request's identity inputs:
| Field | Maps to |
|---|---|
identity_inputs.email | |
| Phone | identity_inputs.phone |
Each identity field can only be added once. Once added, you can configure whether the field is required or optional. A new form starts with a required Email field, and every form must keep at least one required identity field.
Custom fields
Custom fields collect additional information specific to your use case. The following field types are available:
| Field type | Menu label | Description |
|---|---|---|
| Text | Text input | Single-line free-text input. |
| Textarea | Textarea | Multi-line free-text input. |
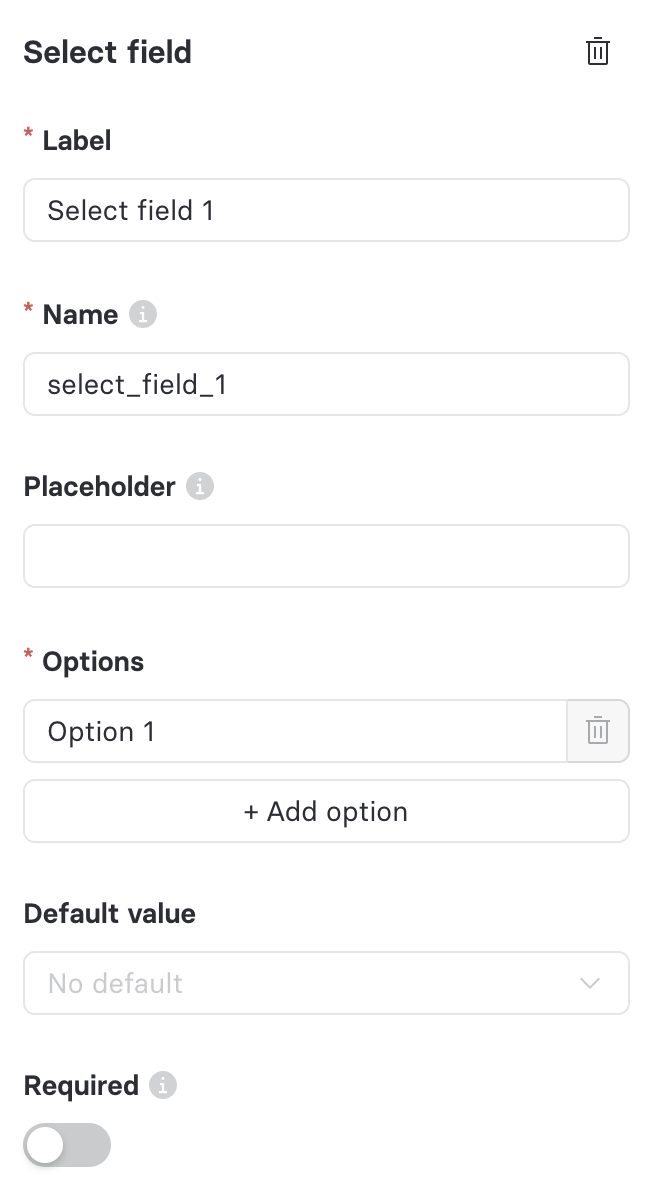
| Select | Single-select dropdown | Single-choice dropdown. |
| Multi-Select | Multi-select dropdown | Multi-choice dropdown allowing multiple selections. |
| Checkbox | Checkbox | A single yes/no checkbox. Submits true or false. |
| Checkbox group | Checkbox group | A set of checkboxes the data subject can toggle independently. Submits the list of selected values. |
| Location | Location picker | Country/region picker using ISO 3166 codes. |
| Date | Date picker | Date picker in ISO 8601 (YYYY-MM-DD) format. |
| File upload | File upload | File attachment with size and type constraints. |
Each field gets a Name when you add it, derived from its label in snake_case. The name is the key the value is stored under and the key other fields reference in visibility conditions, so change it only before you reference it elsewhere.
Configuring field properties
Select a field in the canvas to open its properties in the right panel. The available settings depend on the field type.
Common properties
All fields support:
| Property | Description |
|---|---|
| Label | Display text shown to the data subject. |
| Required | Whether the field must be filled before submitting. |
| Placeholder | Hint text shown inside the empty input. |
Text and Textarea properties
| Property | Description |
|---|---|
| Default value | Pre-filled value. |
| Hidden | Text only. If enabled, the field is not shown to the user but its default value is still submitted. Useful with Query param key for passing values via URL. |
| Query param key | Text only. URL query parameter name used to pre-populate the field when the Privacy Center is opened via a deep link. |
Select, Multi-Select, and Checkbox group properties
| Property | Description |
|---|---|
| Options | The list of choices available to the data subject. Use the options editor to add, remove, and reorder items. Options must be unique and non-empty. |
| Default value | Pre-selected option(s). Not available for Checkbox group. |
A plain Checkbox has only the common properties. It has no options and no default value.
Location properties
| Property | Description |
|---|---|
| IP geolocation hint | When enabled, pre-fills the field based on the user's IP address. |
Date properties
| Property | Description |
|---|---|
| Min | Earliest selectable date (YYYY-MM-DD). |
| Max | Latest selectable date (YYYY-MM-DD). |
File Upload properties
| Property | Description |
|---|---|
| Max file size | Maximum upload size in bytes. Defaults to 10 MB (10,485,760 bytes). |
| Allowed file types | Accepted file extensions (e.g., pdf, jpg, png). See Attachments for the full list of supported types. |
Reordering fields
Drag and drop fields in the canvas to change their display order. The order you set here is the order data subjects will see when filling out the form.
Using the AI assistant
The left panel is an AI assistant that builds and edits the form for you. Describe the form you want in plain language and the fields appear on the canvas as the response streams in. Everything it produces is an ordinary form: select any generated field to adjust it by hand, and save the same way you would after building manually.
What it can do
- Create a complete form from a description, including identity fields, custom fields, options, placeholders, and required flags.
- Add, remove, rename, and reorder fields on the form you already have.
- Set conditional visibility, for example "show this field only when the reason is Other".
- Change field settings such as accepted file types, date ranges, or default values.
It works within the same rules as the builder: it only uses the field types listed above, it keeps at least one required identity field, and for the consent overlay opt-out action it stays within the reduced field set described in Consent form fields.
Example prompts
Start with one prompt that describes the whole form:
Build a DSR intake form for a retailer: a required email, an optional phone number, a "Request reason" dropdown with Account closure, Data correction and Other, a "Tell us more" textarea shown only when the reason is Other, a "State of residence" location picker, and an optional "Supporting document" upload that accepts pdf, jpg and png.
Then refine with short follow-ups. The assistant keeps the conversation, so each prompt applies to the current form:
Make the phone field required and add a placeholder to Tell us more.
Add a date of birth field after phone, and don't allow dates after today.
Remove the supporting document field.
Reviewing and refining the result
Field names are generated from labels, so check them in the properties panel before you reference them elsewhere. Flip on Preview mode to confirm visibility conditions behave as intended, then click Save. Nothing the assistant does is saved until you do.
Stopping, errors, and retries
- Stop. While a response is streaming, the send button becomes a stop button. Stopping discards the partial response and restores the form to the state before that prompt, so a cancelled generation never leaves half a form on the canvas.
- Errors. If the model is unavailable, times out, hits a rate limit, or rejects the request, an error appears above the conversation and the form is restored to its previous state. Wait a moment and send the prompt again. If the message says the form is too large for the model, remove fields you no longer need or make the request more specific.
- Not enabled. If the panel shows that no model provider is configured, the assistant is switched off for your deployment. The rest of the builder works normally. Contact your administrator or Ethyca support to enable it.
Conditional visibility
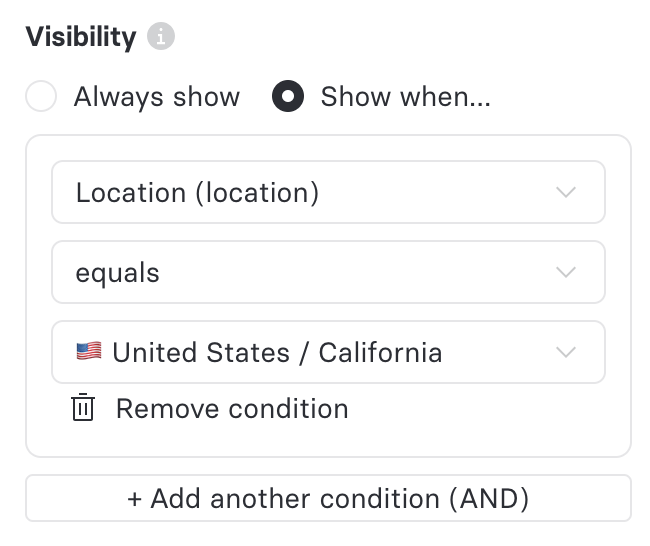
You can configure fields to appear only when certain conditions are met — for example, showing a "Tell us more" text area only when a specific option is selected.
To add a visibility condition:
- Select the field you want to conditionally show.
- In the properties panel, find the Visibility section.
- Add one or more conditions using:
| Setting | Description |
|---|---|
| Source field | The field whose value is evaluated. |
| Operator | The comparison to perform. |
| Value | The value to compare against (not required for all operators). |
Supported operators
| Operator | Meaning |
|---|---|
| Equals | Source field value equals the specified value. |
| Does not equal | Source field value does not equal the specified value. |
| Contains | Source field value contains the specified string. |
| Is set | Source field has been filled in. |
| Is empty | Source field has not been filled in. |
You can add multiple conditions to a single field. When multiple conditions are present, the field is shown only when all conditions are met.
For the JSON-based equivalent, see Conditional Display and Validation.
Edit vs. Preview mode
The form canvas has two modes:
- Edit mode (default) — All fields are displayed regardless of visibility conditions. You can select, configure, and reorder fields.
- Preview mode — Shows the form exactly as the end user will see it, with visibility conditions active. Fields are hidden or shown based on the values you enter in the preview.
Use Preview mode to verify that your conditional visibility rules work as expected before saving.
Saving the form
Click Save to persist your changes. The form builder validates your configuration before saving:
- No duplicate field names — each field must have a unique identifier.
- At least one identity field — the form must include at least one identity field (e.g., Email).
- At least one required identity field — at least one identity field must be marked as required.
When saved, the form builder writes the configuration to the property's underlying custom_privacy_request_fields JSON, identity_inputs, and field_order settings. Changes are reflected immediately in the Privacy Center for that property.
Some advanced configuration options — such as hidden fields with default_value and query_param_key — are also available through the form builder. For the full set of JSON attributes, see Configuration.
Consent form fields
A property can also carry an action for the consent overlay opt-out policy. That form renders inside the Fides.js consent overlay on your website rather than in the Privacy Center, and the overlay supports only a subset of field types.
| Supported in the consent overlay | Not supported |
|---|---|
| Text, Textarea, Select, Checkbox, Checkbox group | Multi-Select, Location, Date, File upload |
When you edit that action, the Add field menu offers only the supported types and Save refuses a form that contains an unsupported one. The consent overlay also renders every field unconditionally, so conditional visibility, hidden fields, and query parameter keys are not saved for this action and the builder warns you when it drops them. If you configure such a form through JSON instead, keep to the supported set: Fides.js silently skips any field type it cannot render.
Field type mapping
If you work with both the form builder and JSON configuration, the table below maps between the two:
| Form Builder | config.json field_type | Notes |
|---|---|---|
| Text | text | |
| Textarea | textarea | |
| Select | select | |
| Multi-Select | multiselect | |
| Checkbox | checkbox | Persists as true or false. |
| Checkbox group | checkbox_group | Persists as a list of the selected values. |
| Location | location | Country/region picker using ISO 3166 codes. |
| Date | date | Date picker in ISO 8601 (YYYY-MM-DD) format. |
| File upload | file | See Attachments for upload configuration. |
The radio field type is available in JSON configuration only. The builder does not offer it, and a form that already contains one cannot be saved from the builder until the field is changed to another type.