Configuration
Assessment settings control the AI models used for generation and questionnaire chat, the Slack channel for SME questionnaires, the tone of outbound messages, and the automatic reassessment schedule.
Opening assessment settings
From the Privacy assessments list page, click the settings icon (gear) next to the Generate assessments button to open the Assessment settings dialog.
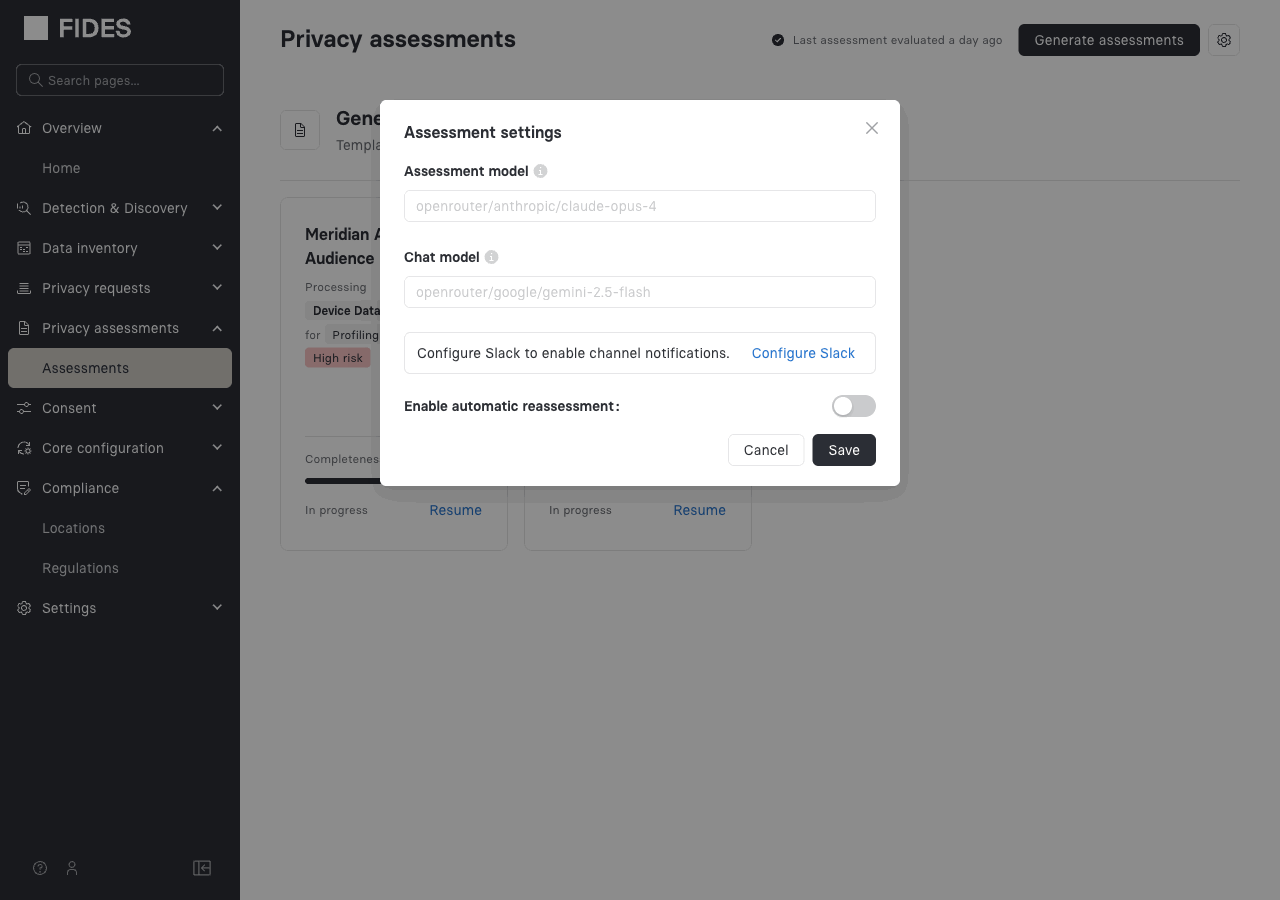
Assessment model
The Assessment model field sets the AI model used to generate assessment answers. Leave it blank to use the default. To use a different model, enter the model identifier shown in the field. Using a more capable model generally produces higher-quality answers but increases generation time.
Chat model
The Chat model field sets the AI model used for Slack questionnaire chat interactions. This can be a lighter, faster model than the assessment model since it handles conversational follow-up rather than deep analysis. Leave it blank to use the default.
Slack integration
The Slack integration connects Astralis to your Slack workspace so you can route unanswered assessment questions to subject-matter experts. Setup has three parts: creating the Astralis Slack app, connecting your Slack workspace, then selecting the channel where Astralis posts questions.
Creating the Astralis Slack app
Before connecting Astralis, you need a Slack app in your workspace. The fastest way to create one is from an app manifest, which pre-configures the required scopes, event subscriptions, and OAuth settings in one step.
You can register multiple bots in a single Slack workspace — for example, one for a staging instance and one for production. However, each bot can only be associated with one Astralis instance: the app's event subscription URL and OAuth credentials point to a single instance, so a bot shared across instances will only deliver events to one of them. Create a separate Slack app for each Astralis instance you want to connect.
- Go to your Slack workspace's app management page (opens in a new tab) and click Create New App.
- Select From a manifest and choose the workspace where you want to install the bot.
- Paste the manifest below, replacing
your-instance.example.com(in both URLs) with your Astralis instance's domain:
display_information:
  name: Astralis
  description: Powered by Astralis
  background_color: "#2b2e35"
features:
  bot_user:
    display_name: Astralis
    always_online: true
oauth_config:
  redirect_urls:
    - https://your-instance.example.com/api/v1/plus/chat/slack/callback
  scopes:
    bot:
      - app_mentions:read
      - assistant:write
      - channels:history
      - channels:join
      - channels:read
      - chat:write
      - groups:history
      - im:history
      - im:read
      - users:read
      - users:read.email
  pkce_enabled: false
settings:
  event_subscriptions:
    request_url: https://your-instance.example.com/api/v1/plus/chat/slack/events
    bot_events:
      - app_mention
      - message.channels
      - message.groups
      - message.im
  org_deploy_enabled: false
  socket_mode_enabled: false
  token_rotation_enabled: false
is_mcp_enabled: false- Review the configuration and click Create.
The manifest grants the following bot token scopes:
- app_mentions:read — receive @mentions of the bot in channels
- assistant:write — act as an AI assistant in Slack's assistant panel
- chat:write — post messages to channels
- channels:join — join public channels
- channels:read — list available channels
- channels:history — read message history for thread replies
- groups:history — read thread replies in private channels
- im:history — read direct messages sent to the bot
- im:read — view basic information about direct message conversations
- users:read — resolve respondent display names
- users:read.email — resolve respondent email addresses
Slack verifies the event subscription request URL when you create the app, so your Astralis instance must be reachable at that URL. If verification fails, you can retry it later under Event Subscriptions in the app settings.
Once you've created the app, note its Client ID, Client Secret, and Signing Secret (found under Basic Information) — you'll need them for the next step.
Connecting your workspace
- Navigate to Settings > Notifications > Chat providers in the Astralis left navigation.
- Click Add a chat provider.
- Enter your Workspace URL (e.g.,
your-company.slack.com), Client ID, Client Secret, and Signing Secret. - Click Save to store the credentials.
- Click Authorize with Slack. Astralis redirects you to Slack where you grant the bot permissions. After authorization, Astralis stores the connection and displays the workspace name with an "Authorized" status.
Only one chat provider can be enabled at a time. If you have multiple workspace configurations, enable the one you want Astralis to use for assessment questionnaires.
Selecting the questionnaire channel
- Return to the Privacy assessments page and open the Assessment settings dialog (gear icon).
- Switch to the Notifications channel tab.
- Select a public channel from the dropdown. Astralis lists all public channels the bot has access to in the connected workspace.
- Click Save.
All assessment questionnaires are posted to this channel. The Astralis bot automatically joins the channel before posting its first message.
Once Slack is configured, the Request input from team button on assessment detail pages becomes active.
Questionnaire tone
You can customize the phrasing Astralis uses when posting questions to Slack. This is useful when your SMEs are non-technical and need questions framed in plain language, or when your organization has a specific communication style. Enter your custom tone instructions in the Questionnaire tone field, or leave it blank to use the system default.
Automatic reassessment
Enable Enable automatic reassessment to have Astralis periodically check all active assessments against the current system state and queue re-evaluation tasks for any that are outdated. If you don't specify a schedule, Astralis uses the system default. See re-evaluating assessments for more on how the re-evaluation process works.